Saturday 23 January 2016

Git - Working with Remotes (2)

In this post we will see how we can follow a git workflow and collaborate project development.

Aim
Build a website for Imperial College of Engineering (IEC). (from 3 Idiots ;)

Team
unckle-bob [role = project owner, maintainer]
sibtainmasih [role = contributor]
+ many others (including you :)

Steps

1. unckle-bob creates a new repository on github.

Repository name = ice-website
Description = Dummy website project for Imperial College of Engineering from 3 Idiots
Select initialize this repository with README


2. sibtainmasih forks this repository.

Search for ice-website, go to repository's page and click on fork. Now he is having a fork under his name.
3. sibtainmasih clone's his repository

$ git clone https://github.com/sibtainmasih/ice-website.git
Cloning into 'ice-website'...
remote: Counting objects: 4, done.
remote: Compressing objects: 100% (4/4), done.
remote: Total 4 (delta 0), reused 4 (delta 0), pack-reused 0
Unpacking objects: 100% (4/4), done.
Checking connectivity... done.


Then he sets config for user.name and user.email

4. sibtainmasih prepares skeleton file structure, commits changes and pushes them to his repo.

$ git log --oneline --decorate --all
77bfa0c (HEAD -> master) Add home file
59c9189 Add index file
a9780bf (origin/master, origin/HEAD) Initial commit

$ git push
Counting objects: 6, done.
Delta compression using up to 4 threads.
Compressing objects: 100% (5/5), done.
Writing objects: 100% (6/6), 647 bytes | 0 bytes/s, done.
Total 6 (delta 1), reused 0 (delta 0)
To https://github.com/sibtainmasih/ice-website.git
   a9780bf..77bfa0c  master -> master


5. unckle-bob takes responsibility of adding courses.html page.

He clones his repository, commits a course.html file and pushes to unckle-bob/ice-website.

sibtainmasih will see not see these changes in his forked repository.

6. Meanwhile sibtainmasih adds few more commits and then creates a Pull Request (PR).

He clicks on Create pull request. It takes to comparing changes page which warns that can't automatically merge due to conflicts.


He continues, clicks on Create Pull Request, provides title, details and completes that. It ends in a warning suggesting branch has conflicts which must be resolved by someone who has write access i.e. unckle-bob

Hold On! As a contributor it is your responsibility to resolve the conflict(s) before making a pull request. Therefore sibtainmasih does the following.

A) Configure a remote upstream to project's central repository -

$ git remote add upstream https://github.com/unckle-bob/ice-website.git

B) Fetch upstream -

$ git fetch upstream
remote: Counting objects: 12, done.
remote: Compressing objects: 100% (8/8), done.
remote: Total 12 (delta 4), reused 12 (delta 4), pack-reused 0
Unpacking objects: 100% (12/12), done.
From https://github.com/unckle-bob/ice-website
 * [new branch]      master     -> upstream/master


C) Check commit history -


D) Merge local master with upstream/master -

$ git merge upstream/master
Auto-merging README.md
CONFLICT (content): Merge conflict in README.md
Automatic merge failed; fix conflicts and then commit the result.


Check which file(s) have conflicts,

$ git status -s
UU README.md
A  courses.html
A  m_c_a.html


resolve that and do $ git commit

Finally see merged commit history


E) Push changes

$ git push


F) And then create a PR. This will now show a green able to merge text -.


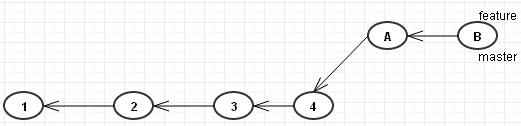
7. unckle-bob reviews the PR and merges in main project repository.

This will show that there is no conflict and the pull request can be merged.

unckle-bob clicks on Merge pull request & the history is properly interlaced.


Remember - There is not autosync. You need to setup upstream and merge/resolve conflicts to make your PRs readily merge-able.

That's it ! This is how git helps to do development in collaboration with other team members.

Git - Working with Remotes (1)

Create a repository for your project named "demo-project" on github. Google will help if you don't know.

What is a Remote Repository?
Remote repository of a project is a git repository hosted on a network or Internet. E.g. github repository named "demo-project" which we just created. These repositories are created to enable collaboration among team members. Everyone will PUSH their code (after resolving conflicts if any) to the remote repository and others will get latest copy of project code with a PULL from remote repository. 

There can be two kinds of remote repositories for a project.
1. Central Remote Repo [Only 1]
2. Forked Remote Repo [1 per team member]

The central remote repo (CRR) of a project will be a read-only repository. All the team members will fork their own remote repos from CRR and will push their changes to forked remote repos (FRR). Once they are ready to merge code in CRR, they need to create a Pull Request (PR) from branch of their FRR to a branch of CRR. Then the code will be reviewed before merging into CRR and making it available to all the FRR of other team members. 

Note: There is option to keep FRR in sync with CRR so that if any pull requests are accepted in CRR, the FRR also gets updated.

With backdrop set, let's dig deeper and understand how to work with remote repositories.

Understanding Git Remote

Scenario 1 
I am already having a local git repository. How can I connect it to remote repository and push my commits?

Solution
Ok. So I already have a git repository which I created using git init command and have my commits in it.

You can use following commands for preparation.

1. Create a project directory -
$ mkdir demo_project_repo
$ cd demo_project_repo/

2. Initialize it as git repository
$ git init

3. Set configs
$ git config --global user.name unckle-bob
$ git config --global user.email bob@gmail.com

4. Check branches (you will not find any branch till first commit).
$ git branch

5. Create index.html
$ vi index.html

6. Status will show index.html as untracked file
$ git status -s
?? index.html

7. Add index.html to staging and check status
$ git add index.html
$ git status -s
A  index.html

8. Commit snapshot
$ git commit -m "Add index.html of project"

(I have made one more commit - total 2)

9. Now check branch & you can see master branch created.
$ git branch
* master

10. -r flag is used to list remote branches
$ git branch -r 

11. -a flag is to list all branches (local + remote)
$ git branch -a
* master

12. To list all the remotes repositories configured in local repo. -v for verbose. (No output as we haven't configured any)
$ git remote -v

 Now I want to connect it to a remote git repository. On github you will find URL for the repo, copy that.


13. Add remote
Syntax - $ git remote add <alias> <url>
$ git remote add origin https://github.com/unckle-bob/demo-project.git

It is just a convention to give alias to central repo as origin. You can use any other alias.

14. Check remotes with -v (verbose) flag 
$ git remote -v
origin  https://github.com/unckle-bob/demo-project.git (fetch)
origin  https://github.com/unckle-bob/demo-project.git (push)

15. You can also see origin remote added in config file.
$ cat .git/config
[core]
        repositoryformatversion = 0
        filemode = false
        bare = false
        logallrefupdates = true
        symlinks = false
        ignorecase = true
        hideDotFiles = dotGitOnly
[user]
        name = unckle-bob
        email = vjtimca11@gmail.com
[remote "origin"]
        url = https://github.com/unckle-bob/demo-project.git
        fetch = +refs/heads/*:refs/remotes/origin/*

16. Let's push our master branch to origin. Note that master in following command specifies local branch.
$ git push -u origin master
Counting objects: 3, done.
Delta compression using up to 4 threads.
Compressing objects: 100% (2/2), done.
Writing objects: 100% (3/3), 280 bytes | 0 bytes/s, done.
Total 3 (delta 0), reused 0 (delta 0)
To https://github.com/unckle-bob/demo-project.git
 * [new branch]      master -> master

17. -u flag in command of step 16 tells git to maintain mapping in config. Next time a simple git push will automatically connect to mapped remote branch.
$ cat .git/config
[core]
        repositoryformatversion = 0
        filemode = false
        bare = false
        logallrefupdates = true
        symlinks = false
        ignorecase = true
        hideDotFiles = dotGitOnly
[user]
        name = unckle-bob
        email = vjtimca11@gmail.com
[remote "origin"]
        url = https://github.com/unckle-bob/demo-project.git
        fetch = +refs/heads/*:refs/remotes/origin/*
[branch "master"]
        remote = origin
        merge = refs/heads/master

18. You can see commits pushed to remote repository.


19. To view remote branches from your local repo 
$ git branch -r
  origin/master

20. To view all branches i.e. local + remote
$ git branch -a
* master
  remotes/origin/master

21. The way local branches are pointers to SHA-1 values commits, same are remote branches.
$ ls -l .git/refs/remotes/origin/
total 1
-rw-r--r-- 1 Usern 197121 41 Jan 21 09:02 master

$ cat .git/refs/remotes/origin/master
02de0b7e6dac98d27b61e31cb0d2722e768f0135
$ git log --oneline --decorate
02de0b7 (HEAD -> master, origin/master) Update index file
00ab6f6 Add index.html of project

$ git remote show origin
* remote origin
  Fetch URL: https://github.com/unckle-bob/demo-project.git
  Push  URL: https://github.com/unckle-bob/demo-project.git
  HEAD branch: master
  Remote branch:
    master tracked
  Local branch configured for 'git pull':
    master merges with remote master
  Local ref configured for 'git push':
    master pushes to master (up to date)


Scenario 2
I am starting with a new project & have created a repository on github. How do I clone it on my local system and continue with development?

Solution
In this case we use clone command. It takes remote repo URL and optional directory name which will be create for local repository.

$ git clone <repo-url> [directory_name]

Scenario 3
I want to contribute to an open source project "django-rest-framework" hosted on github. How can I do that?

Solution

1. Go to central repo of the project on github and fork it.

2. Get URL of your fork of repository and execute following command on your system.

$ git clone https://github.com/unckle-bob/django-rest-framework.git drf

Now do your changes and push to your forked github repo.

3. To merge with central project repo raise a Pull Request (PR)

4. The project owner will review the PR and merge/close it.


Finally few more commands before closing this post.

To rename a remote alias -
$ git remote rename origin gitrepo

To delete a remote alias
$ git remote rm origin

To delete a remote branch
$ git push origin :remote_branch_name

What is the colon (:) magic in last command? - When you do $ git push origin <local_branch_name> it automatically appends :<remote_branch_name> & makes the command as -
$ git push origin local_branch_name:remote_branch_name

Now by not providing any local branch name before colon(:) we action deletion of remote branch. Another command is -
$ git push origin --delete remote_branch_name

You can also do force push using -f command.

Git - Using diff command

In this post I am directly going to hit command line to demonstrate how $ git diff works.

Use Case 1
I changed a tracked file. Now want to see difference between working directory & repo version.

Solution
$ git diff HEAD index.html
diff --git a/index.html b/index.html
index 2a6a819..02b838e 100644
--- a/index.html
+++ b/index.html
@@ -3,6 +3,6 @@

        </head>
        <body>
-               This is index.html page. Adding some more content.
+               Incredible India
        </body>
 </html>
Use Case 2
I staged my changes. Now want to see difference between staged and repo versions of a file.

Solution
In this case if you execute $ git diff there will be no results. Use --cached flag to compare staged and commit versions.

$ git diff --cached index.html

Use Case 3
I edited a staged file & now want to see difference between staged and working copy of the file.

Solution
$ git diff index.html
diff --git a/index.html b/index.html
index 02b838e..6b97ecf 100644
--- a/index.html
+++ b/index.html
@@ -4,5 +4,6 @@
        </head>
        <body>
                Incredible India
+               New Ambassadors - Big B & PC
        </body>
 </html>
Following diagram summarizes the diff commands to use to compare the versions between any of the 3 git repository states.


Use Case 4
Find difference made to a file between two commits.

Solution
I am having index.html file in my repo. I am having two commits.
$ git log --oneline
02de0b7 Update index file
00ab6f6 Add index.html of project

I want to find what is changed in index.html between old and current commit (HEAD).

$ git diff 00ab6f6..HEAD index.html
diff --git a/index.html b/index.html
index 0ce595f..2a6a819 100644
--- a/index.html
+++ b/index.html
@@ -3,6 +3,6 @@

        </head>
        <body>
-               This is index.html page.
+               This is index.html page. Adding some more content.
        </body>
 </html>

It shows a line removed (red) and a new line added (green) replacing old line.

Note: The order of commits in command is important. First old commit then latest commit.

I want to see the words changed.
$ git diff --color-words 00ab6f6..HEAD index.html
diff --git a/index.html b/index.html
index 0ce595f..2a6a819 100644
--- a/index.html
+++ b/index.html
@@ -3,6 +3,6 @@

        </head>
        <body>
                This is index.html page. Adding some more content.
        </body>
</html>

It just shows me words added in green. If any content is removed from file then it will be shown in red.

You can use $ git diff with tree-ish i.e. SHA-1 values or branch names.

E.g.
1. To get difference between two branches -
$ git diff master..feature-home

2. To get differences between two commits with summary and stat-
$ git diff --summary --stat 02de0b7..18ddc0d
 home.html  | 1 +
 index.html | 4 +++-
 2 files changed, 4 insertions(+), 1 deletion(-)
 create mode 100644 home.html

You can use file name(s) in all the above commands to get difference made (if any) in a particular file or set of files.

Setup p4Merge as diff and merge tool

I found it difficult to understand the difference between versions of a file when using a simple console. A better approach is to use P4Merge Tool.

Click here to access the blog post I referred for configuring P4Merge as merge tool in git on Windows.

After download and install, I executed following commands in my git repo.

$ git config --global merge.tool p4merge
$ git config --global mergetool.p4merge.path "C:/Program Files/Perforce/p4merge.exe"

And then to launch P4Merge tool

$ git difftool 


Git - Rebase

Merging branches in git happens in one of the following two fashions.
  1. Fast Forward Merge: It occurs when the commit histories of two branches are linear. It doesn't introduce a new commit.
  2. 3-Way Merge: When the commit histories of the branches are diverged then the last commits of each branch are merged by introducing a new commit.
What if you want to perform a Fast Forward merge with a diverged commit history? The solution is Rebase.  

Illustrating a Rebase

Consider following diagram representing current state of repository's commit history.
Repo Commit History
Merging feature with master will invoke 3-way merge and introduce a new commit as follows.

3-Way Merge
 
To avoid a 3-way, I'll first perform rebase for feature -
$ git checkout feature
$ git rebase master
Repo Commit History - After Rebase
 It has changed the base of feature branch. Repo's commit history depicts that feature branch has been created from master's commit 4. Now a merge in master will be a fast forward merge.
$ git checkout master
$ git merge feature
Fast Forward Merge - After Rebase
We successfully performed rebasing of feature branch onto master. 

How git performs a Rebase?

1. Find common ancestor of master and feature (i.e. 2) by rewinding HEAD of feature
2. Store all changes post commit 2 viz. A, B in a temp location
3. Make HEAD of feature point to master
4. Replay commits A, B on top of master
5. Make HEAD of feature point to tip of commits

If there are any conflicts you need to resolve that and continue with rebase. 
$ git rebase --continue

And if you find rebasing making a mess in the repo, you can abort it too.
$ git rebase --abort


Advanced Rebasing

Consider following as present state of repo history graph.

Now I want to merge commits introduced ONLY by client branch with master. What you think?
$ git checkout master
$ git merge client

NO! It will be a 3-way merge and will also have S1, S2, S3 along with C1, C2.


What we want is -

& following commands will help to achieve this.
$ git rebase --onto master server client
$ git checkout master
$ git merge client

Following are the steps performed for  
$ git rebase --onto master server client
  1. Checkout client branch
  2. Find common ancestor of server and client i.e. S3
  3. Store all commits on client post common ancestor in a temp location viz. C1, C2
  4. Make HEAD of client point to master
  5. Replay commits stored in temp location on top of master
  6. Make HEAD of client point to tip of the commits
A merge between master and server will again be 3-way. I can avoid that and do a rebase without checking out server branch.
Syntax - $ git rebase <base_branch> <topic_brach>
Command - $ git rebase master server


And now you can do a fast forward merge with master.
$ git checkout master
$ git merge server

Notice that the final commit graph is not representing actual state of when from which commit of which branch which other branch is checked out. But it gives a clean view of commit history by means of rebase manipulation. And you doesn't loose your work at all.


Caution Notes:
1. Don't rebase commits which are not yours.
2. Don't rebase your own commits if you have pushed on server and someone has already pulled it in their repo.

Why Rebase

Rebase is not a mandatory action to perform in a usual git workflow. But you can use it to keep your commit history clean. Otherwise 3-way merges will keep on cluttering your commit history with extra commits. Only perform rebase for commits which you own and haven't shared with others.

Sunday 17 January 2016

Python Virtual Environments

In python projects we use different packages of varying versions. Virtual environments help to isolate the dependencies. We can activate a specific environment for a project so as to ensure that it seamlessly works with the respective dependency versions & doesn't interfere with other project which may be using different version of a same package.

To start -
$ apt-get install python-pip
$ pip install virtualenv

If you do a $ pip list here, it will show all the globally installed packages and their versions.
We will store all the environments in a common directory named Environments.
$ mkdir Environments
$ cd !$

Now let's create virtual environment named project_1,
$ virtualenv project_1
Activate the virtual environment project_1,
$ source project_1/bin/activate

The prompt will change a show (project_1) as it is the activated environment. Doing a $ pip list will show only few packages present inside the environment. You can install specific packages required by project inside the environment. E.g.
$ pip install django
To export the packages and version numbers,
$ pip freeze --local > requirements.txt

To get out of the virtual environment,
$ deactivate

To get rid of the virtual environment just delete its directory.
$ rm -rf project_1/

To create environment with specific python version,
$ virtualenv -p /usr/bin/python2.7 py27_env

To install all the packages in this virtual environment,
$ pip install -r requirements.txt

This completely touches on basics of virtual environments in python.

Sunday 3 January 2016

Git - log command

In this post I'll list the different flags for cruising through git commit logs of your repository.

To view complete details of each commit of current branch,
$ git log

To view only to n commits,
$ git log -n

To view one line log message with sha-1 values of last 5 commits,
$ git log --oneline -5
4b0deff Merge branch 'seo_title' into website
7aa136d Merge branch 'visiting_places' into website - 3 way
fec6334 Merge branch 'hotfix_correct_title' into website
3c32660 Adds last line to visiting places
63105a2 Corrects title and adds punch line

There is another option for oneline commits but it will print complete 40 characters of sha.
$ git log --format=oneline -2
4b0deff022231b7f2edf9941cbcf26b0df5a260d Merge branch 'seo_title' into website
7aa136da9c9aa3ad025dad0fee7d6e3bec48d3d2 Merge branch 'visiting_places' into website - 3 way

The other options which can be used with formatter flag are,
$ git log --format=oneline | short | medium | full | fuller | email | raw

You can also define your own pretty formats.

$ git log --pretty=format:"%h - %an, %ar : %s" -2
4b0deff - Alex, 7 days ago : Merge branch 'seo_title' into website
7aa136d - Alex, 7 days ago : Merge branch 'visiting_places' into website - 3 way

Following table taken from Pro Git summarizes different pretty formats.


To view log between two commits 
$ git log --oneline <sha-1_old_commit>..<sha-1_new_commit>
This will log all commit message excluding sha-1_old_commit to sha-1_new_commit included.

E.g.
$ git log --oneline 9bffbda..3c32660
3c32660 Adds last line to visiting places
cb10517 Improves list of visiting places in India
d821d77 Adds header to website

You can also view the commits in which a particular file is changed.
$ git log --oneline header.html
4b0deff Merge branch 'seo_title' into website
63105a2 Corrects title and adds punch line
185c63d Updates header to perform SEO
d821d77 Adds header to website

To view what is changed in a file from a particular commit & before that, use -p (patch) option.
$ git log --oneline -p 63105a2 header.html
63105a2 Corrects title and adds punch line
diff --git a/header.html b/header.html
index bc4e3cf..0258179 100644
--- a/header.html
+++ b/header.html
@@ -1,5 +1,6 @@
 <html>
        <body>
-               <h1>India - Heaven on Mars</h1>
+               <h1>Incredible India - Heaven on Mars</h1>
+               India offers a different aspect of her personality – exotic, extravagant, elegant, eclectic -- to each traveller to the country.
        </body>
 </html>
d821d77 Adds header to website
diff --git a/header.html b/header.html
new file mode 100644
index 0000000..bc4e3cf
--- /dev/null
+++ b/header.html
@@ -0,0 +1,5 @@
+<html>
+       <body>
+               <h1>India - Heaven on Mars</h1>
+       </body>
+</html>

To view commits between a duration use following pair or individual flags with apt values.
  • before, after or
  • since, until 
$ git log --since="2014-12-06'
$ git log --since=2.weeks --until=3.days
$ git log --after='2015-12-06'
$ git log --oneline --after='2015-12-06' --before=1.weeks

To filter commits by author -
$ git log --oneline --author='author name'

To grep commit messages,
$ git log --oneline --grep='Merge'
4b0deff Merge branch 'seo_title' into website
7aa136d Merge branch 'visiting_places' into website - 3 way
fec6334 Merge branch 'hotfix_correct_title' into website

Note - The value of grep is case sensitive. Merge and merge are different.

This is a place where a good commit message will help you. You can use BugFix to find all the commits which are related to some bug fixing process.

This takes a regex. E.g. list all the commit messages which begin with Add -
$ git log --oneline --grep='^Adds'
3c32660 Adds last line to visiting places
d821d77 Adds header to website
9bffbda Adds home page
9f76373 Adds Index file

If you are interested in stats surrounding changes in each commit,
$ git log --stat --summary --oneline
4b0deff Merge branch 'seo_title' into website
7aa136d Merge branch 'visiting_places' into website - 3 way
fec6334 Merge branch 'hotfix_correct_title' into website
3c32660 Adds last line to visiting places
 home.html | 1 +
 1 file changed, 1 insertion(+)
63105a2 Corrects title and adds punch line
 header.html | 3 ++-
......

The best option is to use -
$ git log --graph --oneline --all --decorate


To view changes in a commit,

$ git show HEAD --oneline
4b0deff Merge branch 'seo_title' into website

diff --cc header.html
index 0258179,b1635f6..bcadd56
--- a/header.html
+++ b/header.html
@@@ -1,6 -1,5 +1,6 @@@
  <html>
        <body>
-               <h1>Incredible India - Heaven on Mars</h1>
 -              <h1>India - Heaven on planet Earth</h1>
++              <h1>Incredible India - Heaven on Earth</h1>
 +              India offers a different aspect of her personality – exotic, extravagant, elegant, eclectic -- to each traveller to the country.
        </body>
  </html>

To view what has been changed in a particular file for a specific commit -
$ git show --oneline 3c32660 home.html
3c32660 Adds last line to visiting places
diff --git a/home.html b/home.html
index 26fdd05..9e0455a 100644
--- a/home.html
+++ b/home.html
@@ -9,5 +9,6 @@
                        <li>Hawa Mahal</li>
                        <li>Jantar Mantar</li>
                </ul>
+               Do visit Bengalure, Corbett National Park and Darjeeling.
        </body>
 </html>

I think this is sufficient enough to build awareness about git log, git show, it's switches and knobs.

Git - Stashing

Stash

Stash is a place where we can store changes temporarily without committing them to the repository. This is the special 4th area in Git (other 3 are - Working directory, Staging Index and Repository). Stash are like commits with snapshot of changes but no SHA-1 associated.

Use Cases

1] Git doesn't allow you to switch branch if the working directory is not clean. But I want to switch branch - The solution is Stashing.

2] I am doing some development on a branch and realized that I am on incorrect branch. These all uncommitted changes (working or staging) need be moved to a different branch - The solution is Stashing.


Let's see Stashing in action !

Creating Stash

To create a stash from all changes in working directory,
$ git stash save "Message here for your benefit"

E.g. I edited two files header.html and index.html on website branch. Added header.html to staging and then created stash.

$ git status -s
M  header.html
 M index.html

$ git stash save "Changes in index.html & header.html"

Once it creates stash it executes $ git reset --hard HEAD command & HEAD points to last commit.

View Stash changes

To list all the stashes created,
$ git stash list
stash@{0}: On website: Changes in index.html & header.html

The representation format of stash is 
stash@{<number>}: On <branch_name_on_stash_created>:message

We can refer to a stash by stash@{<number>}

To view changes in a stash, 
$ git stash show stash@{0}
 header.html | 1 +
 index.html  | 1 +
 2 files changed, 2 insertions(+)

To get details about changes, use patch flag (-p)
$ git stash show -p stash@{0}

Pulling Stash Changes

There are two approaches to pull stash changes into present working directory.
1. pop -  (used often) This will pull stashed changes into current working directory and delete stash entry.

$ git stash pop stash@{<number>}

2. apply - This will pull stashed changes into current working directory but will not delete the stash.

$ git stash apply stash@{<number>}

You can pull these changes in the working directory of a different branch too (Refer: Use Case - 2).

Deleting Stash

To delete a particular stash,
$ git stash drop stash@{<number>}

To remove all the stashes,
$ git stash clear

Do you like this article?